Angular ViewChildを使ったコンポーネントの操作と取得方法
サマリー
AngularのViewChildデコレーターは、コンポーネントやディレクティブのインスタンスを取得するための強力なツールです。これにより、親コンポーネントから子コンポーネントのプロパティやメソッドにアクセスすることが可能になり、柔軟なアプリケーションの構築を支援します。本記事では、ViewChildの基本的な使い方や、実際の例を交えてその利用法を詳しく解説します。
ViewChildの基本的な使い方
ViewChildを使うことで、コンポーネント間のデータの受け渡しや操作が容易になります。このデコレーターを使った簡単な実装例を紹介し、使い方を詳しく解説します。
基本的な例
以下のコードは、ViewChildを使って子コンポーネントからメソッドを呼び出す例です。
<my-child-component></my-child-component>
    <button (click)="callChildMethod()">子コンポーネントのメソッドを呼び出す</button>
子コンポーネント
import { Component } from '@angular/core';

    @Component({
        selector: 'my-child-component',
        template: '<p>子コンポーネントです</p>'
    })
    export class ChildComponent {
        public greet() {
            alert('こんにちは、親コンポーネントからの呼び出しです!');
        }
    }
親コンポーネントの実装
import { Component, ViewChild } from '@angular/core';
    import { ChildComponent } from './child.component';

    @Component({
        selector: 'my-parent-component',
        template: `<my-child-component></my-child-component>
                   <button (click)="callChildMethod()">子コンポーネントのメソッドを呼び出す</button>`
    })
    export class ParentComponent {
        @ViewChild(ChildComponent) childComponent!: ChildComponent;

        callChildMethod() {
            this.childComponent.greet();
        }
    }
ディレクティブに対してViewChildを使用する
ViewChildを使用すると、ディレクティブにアクセスすることができます。
例として、SharkDirectiveというディレクティブがあるとします。理想的には、@angular/cliを使用してディレクティブを生成します。
ng generate directive shark
それ以外の場合は、app.module.tsに手動で追加する必要があります。
app.module.ts
import { SharkDirective } from './shark.directive';
...
@NgModule({
  declarations: [
    AppComponent,
    SharkDirective
  ],
  ...
})
このディレクティブは、属性appSharkを持つ要素を検索し、要素内のテキストの先頭に「Shark」という単語を追加します。
shark.directive.ts
import {
  Directive,
  ElementRef,
  Renderer2
} from '@angular/core';

@Directive(
  { selector: '[appShark]' }
)
export class SharkDirective {
  creature = 'Dolphin';

  constructor(elem: ElementRef, renderer: Renderer2) {
    let shark = renderer.createText('Shark ');
    renderer.appendChild(elem.nativeElement, shark);
  }
}
次に、それを使用してコンポーネントテンプレートで「Fin」に「Shark」を追加します。
app.component.html
<span appShark>Fin!</span>
ブラウザでアプリケーションを表示すると、次のように表示されます。
出力
Shark Fin!
これで、SharkDirectiveのcreatureインスタンス変数にアクセスして、extraCreatureインスタンス変数にその値を設定できるようになりました。
app.component.ts
import {
  Component,
  ViewChild,
  AfterViewInit
} from '@angular/core';
import { SharkDirective } from './shark.directive';

@Component({
  selector: 'app-root',
  templateUrl: './app.component.html',
  styleUrls: ['./app.component.css']
})
export class AppComponent implements AfterViewInit {
  extraCreature: string;

  @ViewChild(SharkDirective)
  set appShark(directive: SharkDirective) {
    this.extraCreature = directive.creature;
  };

  ngAfterViewInit() {
    console.log(this.extraCreature); // Dolphin
  }
}
ここではセッターを使用して、extraCreature変数を設定しました。AfterViewInitライフサイクルフックが変数にアクセスするのを待つことに注意してください。これは子コンポーネントとディレクティブが使用可能になったときです。
ブラウザでアプリケーションを表示すると、引き続き「Shark Fin!」というメッセージが表示されます。ただし、コンソールログでは、次のように表示されます。
出力
Dolphin
親コンポーネントは、ディレクティブから値にアクセスできました。
DOM要素に対してViewChildを使用する
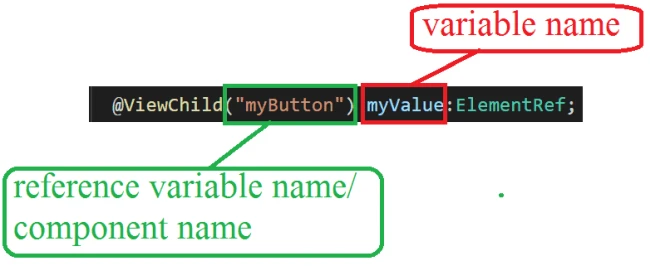
ViewChildを使用すると、テンプレート参照変数を持つネイティブなDOM要素にアクセスすることができます。
例として、#someInput参照変数を持つ<input>がテンプレートにあるとします。
app.component.html
<input #someInput placeholder="Your favorite sea creature">
これで、ViewChildを使用して<input>にアクセスし、値を設定できます。
app.component.ts
import {
  Component,
  ViewChild,
  AfterViewInit,
  ElementRef
} from '@angular/core';

@Component({
  selector: 'app-root',
  templateUrl: './app.component.html',
  styleUrls: ['./app.component.css']
})
export class AppComponent implements AfterViewInit {
  @ViewChild('someInput') someInput: ElementRef;
  ngAfterViewInit() {
    this.someInput.nativeElement.value = 'Whale!';
  }
}
ngAfterViewInitが起動すると、<input>の値は次のように設定されます。
出力
Whale!
親コンポーネントは、子のDOM要素の値を設定することができました。
子コンポーネントに対してViewChildを使用する
ViewChildを使用すると、子コンポ―ネントにアクセスしてメソッドを呼び出したり、子が使用可能なインスタンス変数にアクセスすることができます。
例として、ChildComponentという子コンポーネントがあるとします。理想的には、@angular/cliを使用してコンポーネントを生成します。
ng generate component child --flat
それ以外の場合は、child.component.cssとchild.component.htmlファイルを作成し、app.module.tsに手動で追加する必要があります。
app.module.ts
import { ChildComponent } from './child.component';
...
@NgModule({
  declarations: [
    AppComponent,
    ChildComponent
  ],
  ...
})
メッセージを返すChildComponentにwhoAmIメソッドを追加します。
child.component.ts
whoAmI() {
  return 'I am a child component!';
}
次に、アプリテンプレート内のコンポーネントを参照します。
app.component.html
<app-child>child works!</app-child>
これで、次のようにViewChildを使用して、親コンポーネントクラスからwhoAmIメソッドを呼び出すことができます。
app.component.ts
import {
  Component,
  ViewChild,
  AfterViewInit
} from '@angular/core';
import { ChildComponent } from './child.component';

@Component({
  selector: 'app-root',
  templateUrl: './app.component.html',
  styleUrls: ['./app.component.css'],
})
export class AppComponent implements AfterViewInit {
  @ViewChild(ChildComponent) child: ChildComponent;
  ngAfterViewInit() {
    console.log(this.child.whoAmI()); // I am a child component!
  }
}
ブラウザでアプリケーションを表示すると、コンソールログに次のように表示されます。
出力
I am a child component!
親コンポーネントは、子コンポーネントのwhoAmIメソッドを呼び出すことができました。
ViewChildの高度な利用シーン
ViewChildは単純なデータ取得だけでなく、動的に生成されたコンポーネントやコンテンツの操作にも利用できます。ここでは、より複雑なシナリオでの使用方法を探ります。
動的なコンポーネントの操作
動的に生成されたコンポーネントに対してもViewChildを利用できます。以下の例では、動的に作成された子コンポーネントの参照を取得します。
import { Component, ComponentFactoryResolver, ViewChild, ViewContainerRef } from '@angular/core';
    import { DynamicChildComponent } from './dynamic-child.component';

    @Component({
        selector: 'dynamic-parent',
        template: `<ng-container #container></ng-container>
                   <button (click)="createDynamicComponent()">動的コンポーネントを生成する</button>`
    })
    export class DynamicParentComponent {
        @ViewChild('container', { read: ViewContainerRef }) container!: ViewContainerRef;

        constructor(private componentFactoryResolver: ComponentFactoryResolver) {}

        createDynamicComponent() {
            const componentFactory = this.componentFactoryResolver.resolveComponentFactory(DynamicChildComponent);
            this.container.createComponent(componentFactory);
        }
    }
パフォーマンスへの影響とベストプラクティス: ViewChildの最適な使用方法
パフォーマンス考察
ViewChildは、Angularのコンポーネント内で子コンポーネントやDOM要素への参照を取得するための便利な機能ですが、その利用にあたってはパフォーマンスへの影響を考慮する必要があります。特に、以下の点に注意することで、不必要なリレンダリングやパフォーマンス低下を防ぐことができます。
-
ライフサイクルの管理
ViewChildは、コンポーネントのライフサイクルフックであるngAfterViewInitやngAfterViewCheckedの段階で使用されます。このため、これらのライフサイクルイベントが頻繁にトリガーされると、レンダリングコストが増加する可能性があります。 -
レンダリングコストの抑制
ViewChildで参照する要素やコンポーネントが多すぎると、レンダリングのコストが上昇し、アプリケーション全体のパフォーマンスが低下するリスクがあります。
ベストプラクティス
ViewChildを効果的に利用するためには、以下のベストプラクティスを遵守することが重要です。
| ベストプラクティス | 説明 |
|---|---|
| 利用するコンポーネントの最小化 | 必要なコンポーネントや要素のみをViewChildで参照し、不必要な要素の監視を避けることで、処理負荷を軽減します。 |
| 非同期操作の利用 | 非同期操作を活用し、ViewChildの取得を必要なタイミングで行うことで、パフォーマンス改善が期待できます。例えば、ngAfterViewInitでの非同期処理が有効です。 |
| 変更検知の最適化 | OnPushの変更検知戦略を導入するなど、状態の変化に応じた再描画を最小限にすることで、リソース消費を抑えることができます。 |
具体的な最適化例
- OnPush戦略の導入
コンポーネントにChangeDetectionStrategy.OnPushを設定し、明示的に変更検知が必要な時のみ再描画するようにします。これにより、無駄な再レンダリングが防止されます。
@Component({
  selector: 'app-example',
  templateUrl: './example.component.html',
  changeDetection: ChangeDetectionStrategy.OnPush
})
export class ExampleComponent {
  @ViewChild(ChildComponent) childComponent!: ChildComponent;

  // ViewChildの値が利用可能なタイミングで操作を行う
  ngAfterViewInit() {
    console.log(this.childComponent);
  }
}- 非同期処理の利用
ngAfterViewInitで必要なデータを非同期に取得し、パフォーマンスを最適化します。
ngAfterViewInit() {
  setTimeout(() => {
    console.log(this.childComponent);  // 非同期処理で遅延させる
  }, 0);
}
結論
ViewChildは非常に強力な機能ですが、使用方法を誤るとパフォーマンスに悪影響を与える可能性があります。最小限の参照、非同期操作の活用、変更検知の最適化などのベストプラクティスを導入することで、効率的な開発を実現しましょう。
まとめ
ViewChildを使用して、親コンポーネントクラスからディレクティブ、子コンポーネント、DOM要素にアクセスする方法を学びました。参照が新しい要素に動的に変更された場合は、ViewChildによってその参照は自動的に更新されます。複数の子にアクセスしたい場合は、代わりにViewChildrenを使用します。
Angular の詳細については、Angular トピックページで演習とプログラミングプロジェクトをご覧ください。
参考文献
詳しい情報は以下の文献を参照してください。
Q&A
Q1: ViewChildはいつ使うべきですか?
A1: ViewChildは、親コンポーネントから子コンポーネントへデータやメソッドをアクセスする必要があるときに使用します。
Q2: ViewChildとContentChildは何が違いますか?
A2: ViewChildはテンプレート内で直接指定されたコンポーネントを参照しますが、ContentChildは投影されたコンテンツに対して使われます。
Q3: ViewChildで取得したコンポーネントのプロパティにどうやってアクセスしますか?
A3: ViewChildデコレーターを使用して取得したコンポーネントのインスタンスを通じて、プロパティやメソッドにアクセスできます。