Angularサービス入力:InputとOutputの違いと使い方
概要
この記事では、AngularにおけるInputとOutputの仕組み、ならびにInjectableサービスの役割について詳しく解説します。これにより、Angularアプリケーションのデータ通信とコンポーネント間のやり取りを理解しやすくします。
InputとOutputの基礎知識
Inputプロパティは親コンポーネントから子コンポーネントへのデータの受け渡しを行う方法です。一方、Outputプロパティは子コンポーネントから親コンポーネントへのイベントの発火手段として機能します。
| プロパティ | 説明 |
|---|---|
| Input | 親から子へのデータ受け渡し |
| Output | 子から親へのイベント通知 |
Injectableサービスの概要
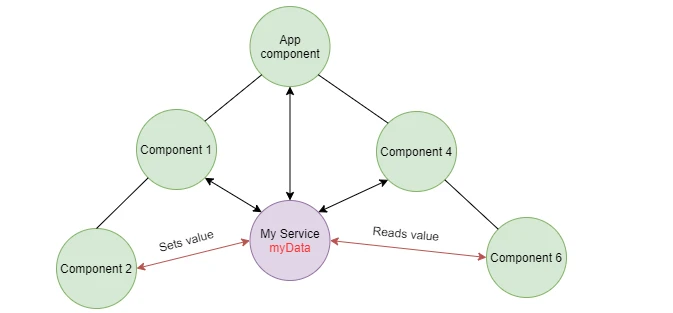
Injectableサービスは、依存性注入を通じてアプリケーション全体で共有可能なデータや機能を提供します。これにより、コンポーネント間の通信が効率化され、コードの再利用性が向上します。
import { Injectable } from '@angular/core';
import { BehaviorSubject } from 'rxjs';

@Injectable({
  providedIn: 'root'
})
export class DataService {
  private messageSource = new BehaviorSubject('初期メッセージ');
  currentMessage = this.messageSource.asObservable();

  changeMessage(message: string) {
    this.messageSource.next(message);
  }
}
InputとOutputの利用シーン
InputとOutputはコンポーネント間の直接的な通信に優れていますが、大規模なアプリケーションではInjectableサービスを使用することで、より柔軟なデータフローを実現することができます。
以下は、InputとOutputを使用したコンポーネントの例です。
@Component({
  selector: '親コンポーネント',
  template: `
    <子コンポーネント [data]="parentData" (notify)="onNotify($event)"></子コンポーネント>
  `
})
export class ParentComponent {
  parentData = '親からのデータ';

  onNotify(event: string) {
    console.log('子からの通知:', event);
  }
}

@Component({
  selector: '子コンポーネント',
  template: `<button>通知を送る</button>`
})
export class ChildComponent {
  @Input() data: string;
  @Output() notify = new EventEmitter();

  sendNotify() {
    this.notify.emit('子が親に送ったメッセージ');
  }
}
このように、AngularのInputとOutputを使用することで、コンポーネント間の情報交換が簡単に行え、動的なアプリケーションの構築が可能になります。
受け渡し方法
Angularでコンポーネント間で値を受け渡すための一般的な方法には、以下のものがあります。
- Input, Output を使う
- Service を使う
- RxJS を使う
- URL に付与する
Input, Output を使う
Input, Output は、親子コンポーネント間で値を受け渡すために使用されます。親コンポーネントから子コンポーネントに値を渡すには Input を、子コンポーネントから親コンポーネントに値を渡すには Output を使用します。
例:親コンポーネントから子コンポーネントへの値の受け渡し
親コンポーネント (parent.component.ts)
import { Component } from '@angular/core';

@Component({
  selector: 'app-parent',
  template: `
    <app-child
      [control]="myControl"
      [placeholder]="myPlaceholder"
      [labelText]="myLabel">
    </app-child>
  `
})
export class ParentComponent {
  myControl = '初期値';
  myPlaceholder = 'プレースホルダー';
  myLabel = 'ラベル';
}
子コンポーネント (child.component.ts)
import { Component, Input } from '@angular/core';

@Component({
  selector: 'app-child',
  template: `
    <label>{{ labelText }}</label>
    <input type="text" [value]="control" [placeholder]="placeholder" />
  `
})
export class ChildComponent {
  @Input() control: string;
  @Input() placeholder: string;
  @Input() labelText: string;
}
実行結果
親コンポーネントで定義した値を、子コンポーネントの Input プロパティにバインドすることで、子コンポーネントでその値を使用することができます。
例:子コンポーネントから親コンポーネントへの値の受け渡し
親コンポーネント (parent.component.ts)
import { Component } from '@angular/core';

@Component({
  selector: 'app-parent',
  template: `
    <app-child (message)="onMessage($event)"></app-child>
    <p>子コンポーネントからのメッセージ: {{ childMessage }}</p>
  `
})
export class ParentComponent {
  childMessage: string;

  onMessage(message: string) {
    this.childMessage = message;
  }
}
子コンポーネント (child.component.ts)
import { Component, Output, EventEmitter } from '@angular/core';

@Component({
  selector: 'app-child',
  template: `
    <input type="text" #messageInput (keyup)="sendMessage(messageInput.value)" />
  `
})
export class ChildComponent {
  @Output() message = new EventEmitter<string>();

  sendMessage(message: string) {
    this.message.emit(message);
  }
}
実行結果
子コンポーネントでは、EventEmitter を使用してイベントを発行し、親コンポーネントではそのイベントを購読することで、子コンポーネントから値を受け取ることができます。
Service を使う
Service を使用すると、親子関係にないコンポーネント間でも値を受け渡すことができます。Service は、コンポーネント間で共有されるデータやロジックを保持するために使用されます。
参考資料
例
サービス (message.service.ts)
import { Injectable } from '@angular/core';

@Injectable({
  providedIn: 'root'
})
export class MessageService {
  private message: string;

  setMessege(message: string) {
    this.message = message;
  }

  getMessege(): string {
    return this.message;
  }
}
親コンポーネント (parent.component.ts)
import { Component } from '@angular/core';
import { MessageService } from './message.service';

@Component({
  selector: 'app-parent',
  template: `
    <button (click)="sendMessage()">子コンポーネントにメッセージを送信</button>
  `
})
export class ParentComponent {
  constructor(private messageService: MessageService) { }

  sendMessage() {
    this.messageService.setMessege('親コンポーネントからのメッセージです。');
  }
}
子コンポーネント (child.component.ts)
import { Component } from '@angular/core';
import { MessageService } from './message.service';

@Component({
  selector: 'app-child',
  template: `
    <button (click)="showMessage()">メッセージを表示</button>
    <p>{{ message }}</p>
  `
})
export class ChildComponent {
  message: string;

  constructor(private messageService: MessageService) { }

  showMessage() {
    this.message = this.messageService.getMessege();
  }
}
実行結果
親コンポーネントと子コンポーネントは、どちらも同じ MessageService を注入することで、サービスを介して値を共有することができます。
RxJS を使う
RxJS は、リアクティブプログラミングを実現するためのライブラリです。RxJS を使用すると、値の変化を監視し、それに応じて処理を実行することができます。コンポーネント間で値をリアルタイムに受け渡したい場合に便利です。
参考資料
例
サービス (data.service.ts)
import { Injectable } from '@angular/core';
import { Subject, Observable } from 'rxjs';

@Injectable({
  providedIn: 'root'
})
export class DataService {
  private dataSubject = new Subject<string>();

  sendData(data: string) {
    this.dataSubject.next(data);
  }

  getData(): Observable<string> {
    return this.dataSubject.asObservable();
  }
}
親コンポーネント (parent.component.ts)
import { Component } from '@angular/core';
import { DataService } from './data.service';

@Component({
  selector: 'app-parent',
  template: `
    <input type="text" #dataInput (keyup)="sendData(dataInput.value)" />
  `
})
export class ParentComponent {
  constructor(private dataService: DataService) { }

  sendData(data: string) {
    this.dataService.sendData(data);
  }
}
子コンポーネント (child.component.ts)
import { Component, OnDestroy } from '@angular/core';
import { DataService } from './data.service';
import { Subscription } from 'rxjs';

@Component({
  selector: 'app-child',
  template: `
    <p>親コンポーネントからのデータ: {{ data }}</p>
  `
})
export class ChildComponent implements OnDestroy {
  data: string;
  subscription: Subscription;

  constructor(private dataService: DataService) {
    this.subscription = this.dataService.getData().subscribe(data => {
      this.data = data;
    });
  }

  ngOnDestroy() {
    this.subscription.unsubscribe();
  }
}
実行結果
親コンポーネントでは、入力値が変更されるたびに DataService の sendData メソッドを呼び出してデータを送信します。子コンポーネントでは、DataService の getData メソッドから Observable を取得し、購読することで、データの変更をリアルタイムに受け取ることができます。
URL に付与する
URL にパラメータを付与することで、コンポーネントに値を渡すことができます。これは、例えば、ユーザーの詳細情報ページなど、URL に基づいて異なるコンテンツを表示したい場合に便利です。
参考資料
例
app.module.ts
import { NgModule } from '@angular/core';
import { RouterModule, Routes } from '@angular/router';
import { UserComponent } from './user/user.component';

const routes: Routes = [
  { path: 'user/:id', component: UserComponent }
];

@NgModule({
  imports: [RouterModule.forRoot(routes)],
  exports: [RouterModule]
})
export class AppRoutingModule { }
app.component.html
<a routerLink="/user/1">ユーザー1</a> |
<a routerLink="/user/2">ユーザー2</a>
<router-outlet></router-outlet>
サービス (user.service.ts)
import { Injectable } from '@angular/core';

@Injectable({
  providedIn: 'root'
})
export class UserService {
  getUsers() {
    return [
      { id: 1, name: '田中太郎' },
      { id: 2, name: '佐藤花子' }
    ];
  }

  getUser(id: number) {
    return this.getUsers().find(user => user.id === id);
  }
}
ユーザー情報コンポーネント (user.component.ts)
import { Component, OnInit } from '@angular/core';
import { ActivatedRoute } from '@angular/router';
import { UserService } from '../user.service';

@Component({
  selector: 'app-user',
  template: `
    <h2>ユーザー情報</h2>
    <p>ID: {{ user.id }}</p>
    <p>名前: {{ user.name }}</p>
  `
})
export class UserComponent implements OnInit {
  user: any;

  constructor(
    private route: ActivatedRoute,
    private userService: UserService
  ) { }

  ngOnInit() {
    const id = +this.route.snapshot.paramMap.get('id');
    this.user = this.userService.getUser(id);
  }
}
実行結果
ActivatedRoute を使用することで、URL からパラメータを取得することができます。この例では、ユーザー ID を URL から取得し、UserService を使用してユーザー情報を取得しています。
参考文献
Q&A
Q1: InputとOutputはどのように違いますか?
A1: Inputは親から子へのデータ受け渡しを行い、Outputは子から親へのイベント通知を行います。
Q2: Injectableサービスはどのように利用しますか?
A2: Injectableサービスは依存性注入を通じて、他のコンポーネントやサービスで利用できます。
Q3: InputとOutputの両方を使用する際の最適なパターンは何ですか?
A3: 小規模なコンポーネント間の直接通信にはInputとOutputを使い、大規模なアプリケーションではInjectableサービスを併用するのが最適です。