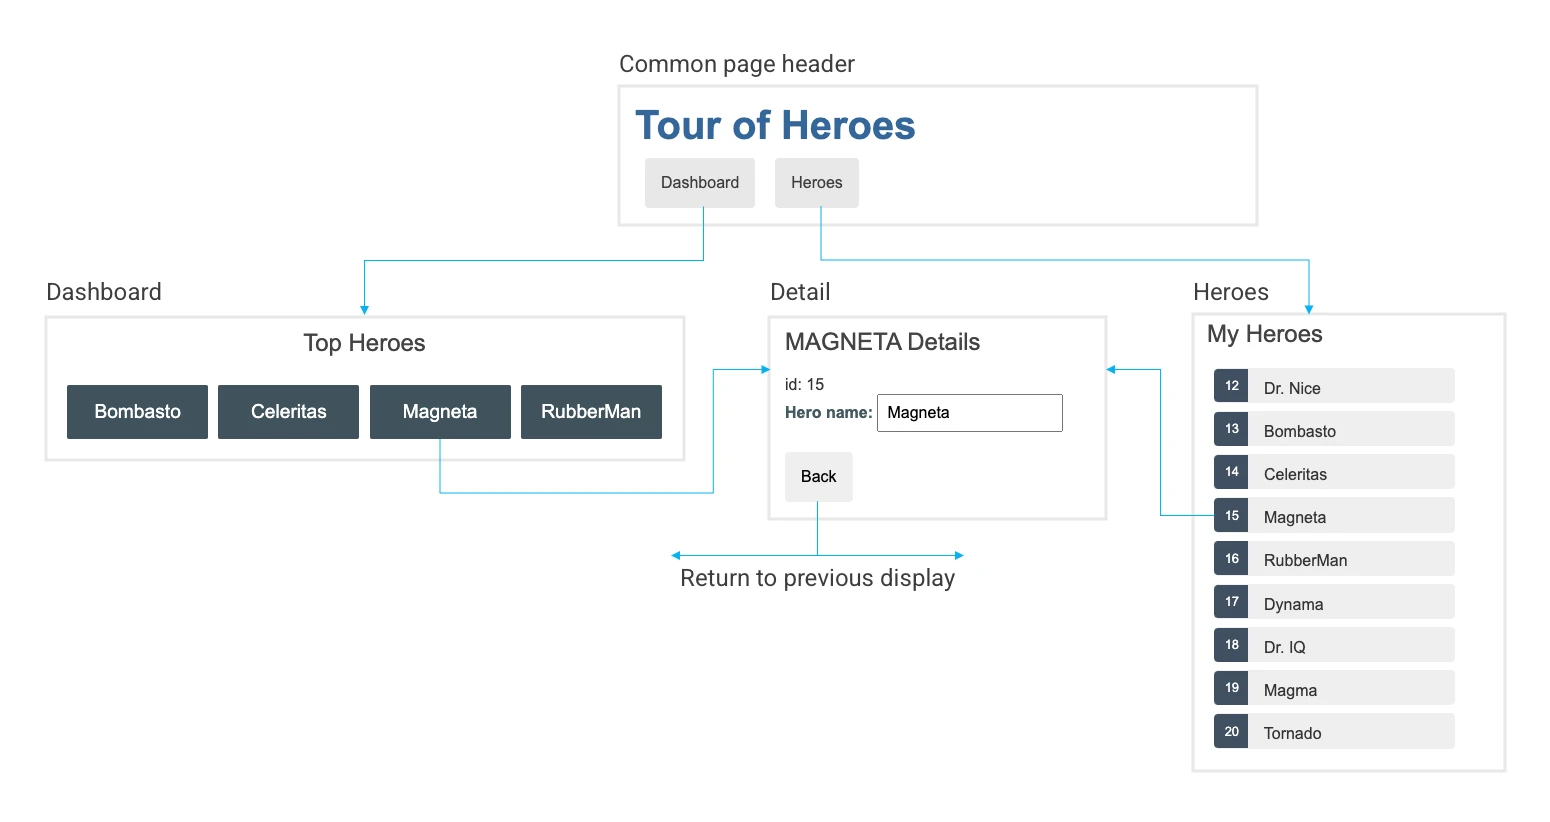
Angular Routingの概要
このガイドでは、Angularアプリケーションにおけるルーティングの基本概念と実装方法を紹介します。ルーティングは、ユーザーがアプリケーション内を移動する際の重要な要素であり、コンポーネントの表示やURLの管理を効率的に行う手段を提供します。
ルーティングとは、URLに応じて表示するページを切り替える機能のことです。SPA (Single Page Application) では、ページ遷移時にサーバーにリクエストを送信せずに、JavaScriptを使って動的にDOMを変更することで実現します。しかし、URLを変更しないとブラウザの履歴に追加されなかったり、ブックマークができなかったりといった問題があります。そこで、Angularでは@angular/routerライブラリを使って、URLの変更を処理しています。
ルーティングの基本設定
Angularでルーティングを設定するには、@angular/routerモジュールを使用します。このモジュールには、ルーティングに必要なクラスや関数が含まれています。ルーティングの基本的な設定は、以下のようになります。
import { NgModule } from '@angular/core';
import { RouterModule, Routes } from '@angular/router';
// コンポーネントのインポート
import { HomeComponent } from './home/home.component';
import { AboutComponent } from './about/about.component';
// ルーティングの設定
const routes: Routes = [
{ path: '', component: HomeComponent }, // ルートパスへのアクセスはHomeComponentを表示
{ path: 'about', component: AboutComponent } // /aboutへのアクセスはAboutComponentを表示
];
@NgModule({
imports: [RouterModule.forRoot(routes)],
exports: [RouterModule]
})
export class AppRoutingModule { }
実装内容
今回の実装では、以下のURLとページの対応とします。
/:ホーム画面 (HomeComponent)/about:About画面 (AboutComponent)- 存在しないパス:404画面 (NotFoundComponent)
上記を踏まえ、ルーティングの設定は以下のようになります。
// src/app/app-routing.module.ts
import { NgModule } from '@angular/core';
import { RouterModule, Routes } from '@angular/router';
import { HomeComponent } from './home/home.component';
import { AboutComponent } from './about/about.component';
import { NotFoundComponent } from './not-found/not-found.component';
const routes: Routes = [
{ path: '', component: HomeComponent },
{ path: 'about', component: AboutComponent },
{ path: '**', component: NotFoundComponent }
];
@NgModule({
imports: [RouterModule.forRoot(routes)],
exports: [RouterModule]
})
export class AppRoutingModule { }
Routesとrouter-outlet
上記のroutes変数は、Routes型の配列です。Routes型は、pathとcomponentというプロパティを持つオブジェクトの配列です。pathプロパティは、URLのパスを指定します。componentプロパティは、そのパスにアクセスがあったときに表示するコンポーネントを指定します。
RouterModule.forRoot(routes)は、ルートモジュールにルーティングを設定するために使用します。RouterModule.forRoot()メソッドは、Routes型の配列を受け取り、ルーティングを設定したRouterModuleオブジェクトを返します。
最後に、app.component.htmlなどに<router-outlet>タグを配置します。router-outletタグは、ルーティングされたコンポーネントが表示される場所です。
<router-outlet></router-outlet>
404画面へのルーティング
存在しないパスにアクセスがあった場合に、404画面を表示するように設定できます。routes変数に、pathプロパティに**を指定したオブジェクトを追加します。**は、ワイルドカードと呼ばれ、任意のパスにマッチします。
const routes: Routes = [
// ... other routes ...
{ path: '**', component: NotFoundComponent }
];
参考)リダイレクトさせたい場合
特定のパスにアクセスがあった場合に、別のパスにリダイレクトさせることができます。redirectToプロパティとpathMatchプロパティを使用します。
const routes: Routes = [
// ... other routes ...
{ path: 'contact', redirectTo: 'about', pathMatch: 'full' }
];
redirectToプロパティは、リダイレクト先のパスを指定します。pathMatchプロパティは、パスのマッチ方法を指定します。fullを指定すると、パス全体が一致した場合にのみリダイレクトします。
機能モジュールへのルーティング
Angularでは、機能ごとにモジュールを作成することができます。機能モジュールにもルーティングを設定することができます。機能モジュールにルーティングを設定するには、RouterModule.forChild()メソッドを使用します。
// src/app/account/account-routing.module.ts
import { NgModule } from '@angular/core';
import { RouterModule, Routes } from '@angular/router';
import { LoginComponent } from './login/login.component';
import { ProfileComponent } from './profile/profile.component';
const routes: Routes = [
{ path: 'login', component: LoginComponent },
{ path: 'profile', component: ProfileComponent }
];
@NgModule({
imports: [RouterModule.forChild(routes)],
exports: [RouterModule]
})
export class AccountRoutingModule { }
機能モジュールのルーティングは、メインモジュールのルーティングに追加する必要があります。メインモジュールのルーティングに追加するには、loadChildrenプロパティを使用します。
// src/app/app-routing.module.ts
const routes: Routes = [
// ... other routes ...
{
path: 'account',
loadChildren: () => import('./account/account.module').then(m => m.AccountModule)
}
];
他のページに遷移する
コンポーネントから他のページに遷移するには、Routerサービスを使用します。Routerサービスは、@angular/routerモジュールからインポートします。
import { Component } from '@angular/core';
import { Router } from '@angular/router';
@Component({
// ...
})
export class HomeComponent {
constructor(private router: Router) {}
goToAboutPage() {
this.router.navigate(['/about']);
}
}
router.navigate()メソッドは、引数にパスを指定することで、そのパスに遷移します。
ルーティングモジュールの仕組み
Angularのルーティングは、{@code import { RouterModule, Routes } from '@angular/router';}を使用して設定されます。以下は、基本的なルートの定義方法の例です:
import { NgModule } from '@angular/core';
import { RouterModule, Routes } from '@angular/router';
import { HomeComponent } from './home/home.component';
import { AboutComponent } from './about/about.component';

const routes: Routes = [
  { path: '', component: HomeComponent },
  { path: 'about', component: AboutComponent },
];

@NgModule({
  imports: [RouterModule.forRoot(routes)],
  exports: [RouterModule]
})
export class AppRoutingModule { }
ナビゲーションの実現
ナビゲーションは、ルータリンクを使って実装します。以下のように、{@code RouterLink}ディレクティブを使用してリンクを作成できます:
Home
About
ルーティング設定と動的ルートの生成
動的なルートを生成することも可能です。例えば、以下のようにパラメータ付きのルートを設定します:
{ path: 'user/:id', component: UserComponent },
この設定により、ユーザーのIDに基づいて異なるコンポーネントを表示することができます。
ルーティングに関する参考文献
| タイトル | 著者 | 発行年 |
|---|---|---|
| Angular Routing & Navigation | Angular Team | 2023 |
| Learning Angular | Shyam Sundar | 2022 |
QA
- Q: Angularのルーティングを使う理由は何ですか? A: ルーティングを使用すると、ユーザーがアプリケーション内を効率的にナビゲートでき、コンポーネントの表示状態を管理しやすくなります。
- Q: ルートパラメータはどのように取得しますか? A: {@code ActivatedRoute}をインポートし、コンポーネント内で使用することで、ルートパラメータにアクセスできます。
- Q: 子ルートはどのように設定しますか? A: 親ルートの設定の中に{@code children}プロパティを追加することで、子ルートを設定できます。