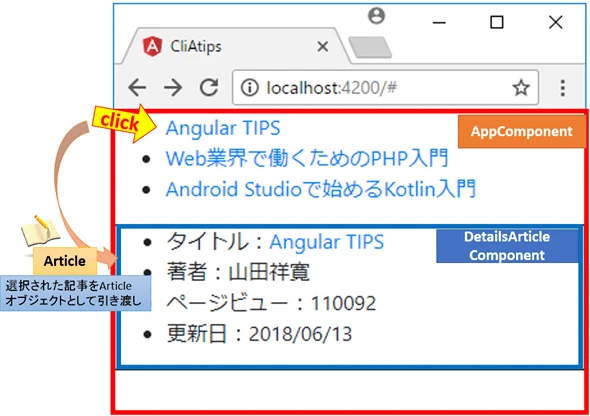
Angular コンポーネント 呼び出しの基礎と実践
概要
この記事では、Angularにおけるコンポーネントの呼び出し方について解説します。基本的な概念から、実際の使用例までを紹介し、開発者がAngularのコンポーネントシステムを活用するための手助けをします。
Angular コンポーネントの基本
Angularにおけるコンポーネントとは何か、その基本的な構造と役割について説明します。コンポーネントがどのようにアプリケーションのビルディングブロックとなるのかを理解しましょう。
| 項目 | 説明 |
|---|---|
| コンポーネント | アプリケーションのUIを構成する基本単位 |
| テンプレート | HTMLで構成され、コンポーネントのビューを定義 |
| クラス | コンポーネントの動作ロジックを提供 |
| スタイル | コンポーネントに適用されるCSSスタイル |
コンポーネントの呼び出し方法
コンポーネントを呼び出すための様々な方法について詳しく解説します。親コンポーネントから子コンポーネントへのデータの受け渡しや、イベントのバインディングについても学びます。
親から子へのデータ受け渡し
親コンポーネントは子コンポーネントにデータを渡すことができます。以下はそのサンプルコードです。
  <app-parent>
    <app-child [inputData]="parentData"></app-child>
  </app-parent>
イベントバインディング
子コンポーネントで発生したイベントを親コンポーネントに伝えることも可能です。以下はそのサンプルコードです。
<app-child (eventName)="handleEvent($event)"></app-child>
実践的なサンプルコード
具体的なサンプルコードを通じて、Angularコンポーネントを呼び出す実践的な手法を紹介します。実際のアプリケーション開発における活用方法を考察します。
import { Component } from '@angular/core';

@Component({
  selector: 'app-parent',
  template: `
    <h1>親コンポーネント</h1>
    <app-child [inputData]="parentData" (eventName)="handleEvent($event)"></app-child>
  `,
})
export class ParentComponent {
  parentData = '親からのデータ';

  handleEvent(event: any) {
    console.log(event);
  }
}

@Component({
  selector: 'app-child',
  template: `
    <div>入力データ: {{ inputData }}</div>
    <button (click)="emitEvent()">イベント送信</button>
  `,
})
export class ChildComponent {
  @Input() inputData: string;
  @Output() eventName = new EventEmitter();

  emitEvent() {
    this.eventName.emit('子からのイベントデータ');
  }
}
作業環境
| 環境 | バージョン | 備考 |
|---|---|---|
| Angular CLI | v6.0.0 → v11.0.5 | $ ng --version |
| Angular | v6.0.0 → v11.0.5 | |
| TypeScript | v4.0.2 | |
| Node.js | v9.2.1 → v12.18.3 | $ node --version |
| npm | v6.1.0 → v6.14.6 | $ npm --version |
デコレータを使用して参照を取得する方法
Angularでは、コンポーネント間でデータをやり取りしたり、外部コンテンツの参照を取得するために、以下のデコレータが用意されています。
| デコレータ | 用途 | 備考 |
|---|---|---|
@ViewChild |
単一の子コンポーネントを取得する | |
@ViewChildren |
複数の子コンポーネントをリストで取得する | QueryList として取得される |
@ContentChild |
単一の外部コンテンツ(コンポーネント)を取得する | |
@ContentChildren |
複数の外部コンテンツ(コンポーネント)をリストで取得する | QueryList として取得される |
それぞれのデコレータは、単一または複数のコンポーネントを取得するために使用され、リスト形式で取得した場合は QueryList として格納されます。
本記事では、以下のケースでデコレータを使用して実際に動作を確認します:
- 子コンポーネントの取り込みでは
@ViewChildren - 外部コンテンツの取り込みでは
@ContentChild
構成
まず、取り込むコンポーネントの構成について説明します。本記事では、親コンポーネントと子コンポーネント、さらに外部コンテンツを組み合わせてアプリケーションを構築します。
ツリー構造
親コンポーネントは子コンポーネントや外部コンテンツを取り込み、それぞれの参照を取得していきます。
src/
  `- app/
       `- content-child/
       |   `- content-child.component.css
       |   `- content-child.component.html
       |   `- content-child.component.ts
       `- content-parent/
       |   `- content-parent.component.css
       |   `- content-parent.component.html
       |   `- content-parent.component.ts
       `- view-child/
       |   `- view-child.component.css
       |   `- view-child.component.html
       |   `- view-child.component.ts
       `- view-parent/
       |   `- view-parent.component.css
       |   `- view-parent.component.html
       |   `- view-parent.component.ts
       `- app.component.css
       `- app.component.html
       `- app.component.ts
`- app.module.ts- 親コンポーネント:
view-parent及びcontent-parent - 子コンポーネント:
view-child及びcontent-child
テンプレートの定義 (app.component.html)
次に、親コンポーネントと子コンポーネントの定義、外部コンテンツの定義をテンプレートファイルに記述していきます。
<div>
  <div class="block-header">
    <p>子コンポーネントの取り込みを確認するためのブロック</p>
  </div>
  <div class="block-body">
    <app-view-parent></app-view-parent>
  </div>
</div>

<div>
  <div class="block-header">
    <p>外部コンテンツの取り込みを確認するためのブロック</p>
  </div>
  <div class="block-body">
    <app-content-parent>
      <app-content-child class="external-contents-component"></app-content-child>
    </app-content-parent>
  </div>
</div>
子コンポーネントの取り込み確認
親コンポーネント (view-parent.component.ts)
親コンポーネントでは、子コンポーネントの参照を取得するために @ViewChildren デコレータを使用します。
import { Component, AfterViewChecked, ViewChildren, QueryList } from '@angular/core';
import { ViewChildComponent } from '../view-child/view-child.component';

@Component({
  selector: 'app-view-parent',
  templateUrl: './view-parent.component.html',
  styleUrls: ['./view-parent.component.css']
})
export class ViewParentComponent implements AfterViewChecked {
  public valueBox: String[] = ['', '', ''];
  @ViewChildren(ViewChildComponent) viewChildren!: QueryList<ViewChildComponent>;

  constructor() {}

  ngAfterViewChecked() {
    this.viewChildren.forEach((item, index) => {
      if (this.valueBox[index] !== item.inputValue) {
        setTimeout(() => {
          this.valueBox[index] = item.inputValue;
        }, 0);
      }
    });
  }
}
ngAfterViewChecked メソッド内で、ViewChildren で取得した子コンポーネントのリストをループ処理し、各子コンポーネントの入力値を valueBox 配列にセットしています。
子コンポーネント (view-child.component.ts)
import { Component } from '@angular/core';

@Component({
  selector: 'app-view-child',
  templateUrl: './view-child.component.html',
  styleUrls: ['./view-child.component.css']
})
export class ViewChildComponent {
  public inputValue: String = '';
}
子コンポーネントでは単純な入力フィールドを持っており、この値が親コンポーネントで利用されます。
動作確認
- 起動時: 初期状態では、子コンポーネントの入力フィールドは空です。
- 入力後: 各子コンポーネントで入力した値が、親コンポーネントでまとめて表示されます。
外部コンテンツの取り込み確認
外部コンテンツの取り込みについては @ContentChild デコレータを使用します。
参考文献
Q&A
- 1. コンポーネントとテンプレートの違いは何ですか?
- コンポーネントはロジックを提供し、テンプレートはUIの見た目を定義します。
- 2. コンポーネント間でデータを渡す際のベストプラクティスは?
- 親から子へのデータバインディングを使用し、子から親へのデータはイベントを通じて行うのがベストプラクティスです。
- 3. コンポーネント内でスタイルを定義する方法は?
- コンポーネントのデコレーター内にstylesまたはstyleUrlsプロパティを使用してスタイルを定義します。
その他の参考記事:angular コンポーネント 追加